Bread shaping is more than a simple aesthetic choice—it’s an essential part of ensuring that your dough rises evenly and bakes into the perfect loaf or bun. Whether you’re crafting rustic boules or intricate hot cross buns, the techniques you use during shaping have a profound impact on the final product. In this blog post, we’ll walk you through various shaping techniques, provide insider tips for getting the best rise and form, and highlight the importance of proofing and scoring in bread-making.
By the end, you’ll be shaping like a pro, whether you’re creating a simple boule, an elongated baguette, or decorative buns for special occasions. So grab your dough and let’s dive into the world of perfect shaping techniques.
Table of Contents:
- Why Shaping Matters in Bread Making
- Essential Shaping Techniques
- Tips for Achieving the Perfect Shape and Rise
- The Importance of Proper Proofing
- Scoring: Making Your Loaf Look and Bake Perfectly
- Conclusion: Craft Your Perfect Loaf
1. Why Shaping Matters in Bread Making
Shaping dough is not just about presentation—it’s a crucial step that ensures even baking and optimal texture. Whether you’re aiming for a fluffy interior or a crunchy crust, the shape directly affects how heat penetrates the dough, how the loaf expands during proofing, and how gases escape through the surface. Mastering the perfect shaping techniques gives your bread the chance to develop its ideal crumb structure while also enhancing its appearance.
Moreover, different shapes suit different types of dough. A well-shaped boule will rise differently from a baguette or a cinnamon roll, and understanding why and how to shape each will elevate your baking results. Additionally, well-executed shaping allows for proper proofing and scoring, which ensures that your loaves or buns achieve their full potential.
2. Essential Shaping Techniques
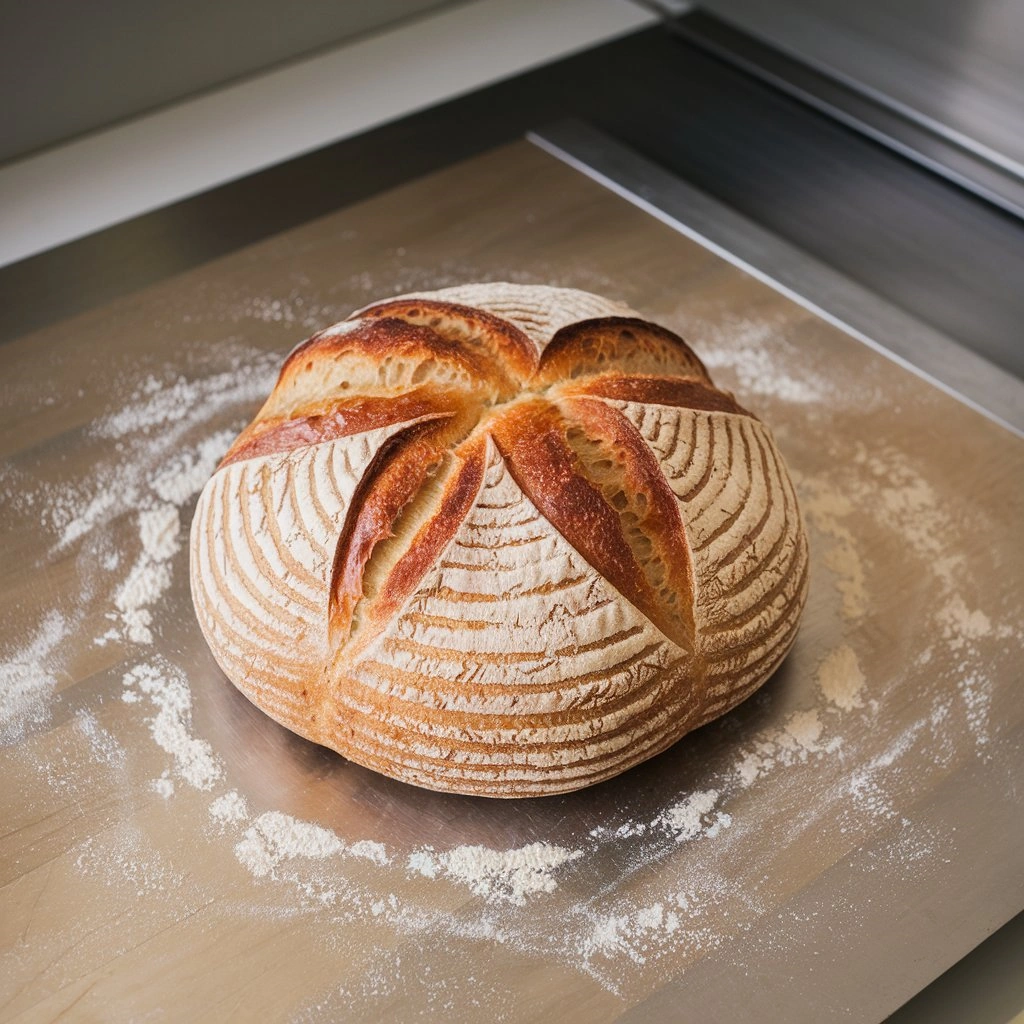
Shaping the Classic Boule
A boule, French for “ball,” is a traditional round loaf with a chewy crust and open crumb. It’s one of the most common shapes for homemade bread because of its simplicity and versatility.
- Steps for shaping a boule:
- After the dough’s first rise, turn it out onto a lightly floured surface.
- Pull the edges of the dough inward to form a rough ball.
- Flip the dough over and use the edges of your hands to tuck and tighten the surface, creating tension.
- Rotate the dough and repeat this process until the surface is taut and smooth.
- Tips:
- A good boule should have a tight surface to promote a uniform rise and prevent the loaf from flattening. Use your hands to shape the dough quickly and confidently—overhandling can degas the dough and inhibit the rise.
For more tips on proofing your boule to perfection, read The Science of Fermentation.

Mastering the Baguette
A baguette is distinguished by its long, narrow shape, chewy crust, and soft interior. Achieving the right shape is key to getting that crisp crust and airy crumb.
- Steps for shaping a baguette:
- Begin with a rectangular piece of dough.
- Fold the top third of the dough over to the center and press firmly to seal.
- Fold the bottom third over the top, sealing again.
- Using your hands, roll the dough outwards to elongate it, tapering the ends slightly for the classic baguette shape.
- Tips:
- Aim for a consistent thickness along the baguette to ensure even baking. Be careful not to press too hard, as this can compress the dough and reduce the rise.
Check out oven temperature and baking techniques for maintaining the ideal bake for your baguette.
Crafting Cinnamon Rolls
When shaping cinnamon rolls, the key is creating an even spiral that bakes evenly and holds the filling in place.
- Steps for shaping cinnamon rolls:
- Roll out the dough into a large rectangle, ensuring even thickness.
- Spread your filling evenly, leaving a small border around the edges.
- Starting from one long edge, roll the dough tightly into a log.
- Slice into even portions and place them cut-side-up in a greased pan.
- Tips:
- Rolling the dough too tightly can force the filling out during baking, while a loose roll may result in uneven baking. Finding the balance is essential to a beautiful, uniform spiral.
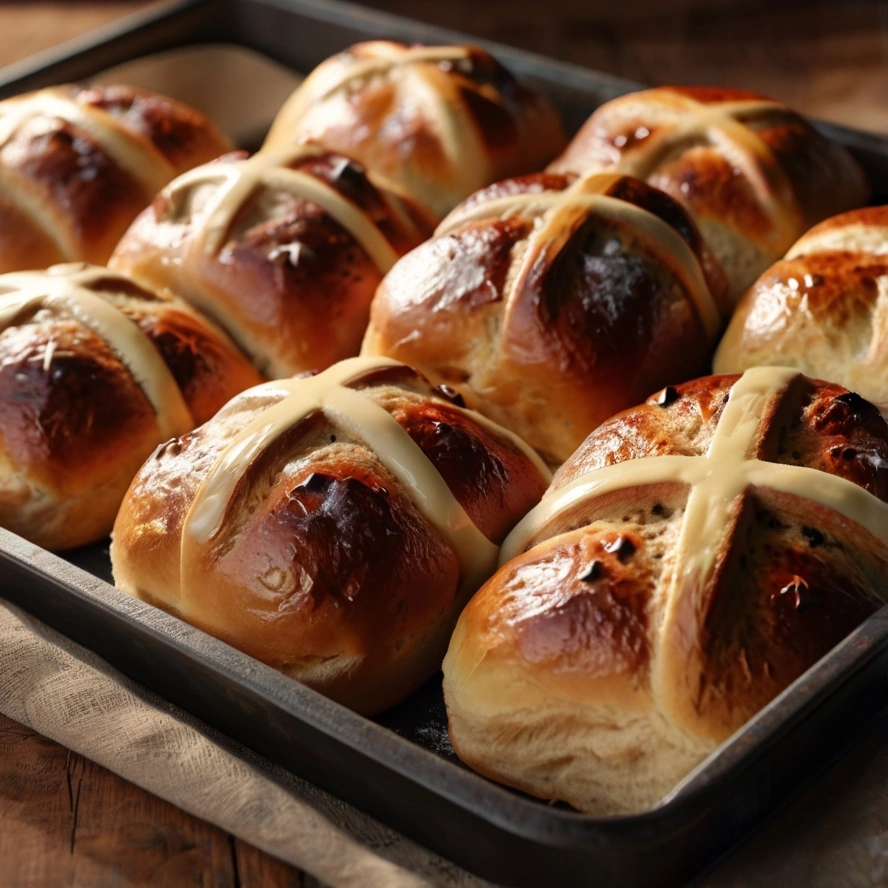
Forming Hot Cross Buns
Hot cross buns are a favorite during festive occasions, known for their soft texture and signature cross marking. The shape is essential to achieving the fluffy interior and uniform bake.
- Steps for shaping hot cross buns:
- Divide the dough into equal portions.
- Roll each portion into a tight, smooth ball by cupping your hand around the dough and moving it in circular motions.
- Place the dough balls on a tray with enough space for rising.
- Once proofed, score a cross into the top using a sharp knife before baking.
- Tips:
- Even shaping ensures each bun rises and bakes at the same rate. The cross should be deep enough to mark the buns but not so deep that it disturbs the rise.
3. Tips for Achieving the Perfect Shape and Rise
Achieving the perfect shaping techniques requires practice, but a few key tips can help you get the desired shape and rise:
- Tension is Key: Whether you’re shaping a boule or a bun, creating surface tension helps the dough rise evenly. Use your hands to gently stretch the dough surface while shaping.
- Avoid Overhandling: Too much manipulation of the dough can degas it, resulting in a flat loaf or bun. Work quickly but carefully.
- Use Flour Sparingly: Too much flour during shaping can lead to a tough crust. Dust lightly, but avoid excessive amounts that will dry out the dough.
- Allow for Expansion: Place your shaped dough with enough room to expand during proofing. Overcrowding can cause misshapen loaves or buns.
4. The Importance of Proper Proofing
Once your bread is shaped, proofing allows the dough to rest and rise before baking. Proper proofing ensures that the yeast ferments the dough adequately, giving your bread its characteristic flavor and texture. Under-proofing will lead to dense, compact bread, while over-proofing can cause the dough to collapse during baking.
Here are some key signs to tell if your dough is properly proofed:
- Dough Doubles in Size: Most doughs are ready when they have visibly doubled in size.
- Finger Dent Test: Gently press your finger into the dough; if the indentation remains and springs back slightly, the dough is proofed. If it springs back too quickly, it needs more time.
Learn more about the science behind proofing in this article: The Science of Fermentation. You can also check this external links about how to Shape Your Dinner Rolls.
5. Scoring: Making Your Loaf Look and Bake Perfectly
Scoring is the process of making shallow cuts on the surface of the dough before baking. These cuts control how the dough expands in the oven, allowing the steam to escape and the loaf to rise in a controlled manner.
- Why Scoring Matters: Without scoring, the loaf may burst unpredictably in the oven, leading to an unattractive and uneven shape.
- How to Score: Use a sharp knife or bread lame to make swift, clean cuts just before baking. The angle and depth of the cuts will affect the final look of your bread.
- Patterns and Designs: While scoring is functional, it can also be artistic. Many bakers use scoring to create beautiful designs on the surface of their loaves, from simple slashes to intricate patterns.
6. Conclusion: Craft Your Perfect Loaf
Mastering perfect shaping techniques is a fundamental skill for any baker, whether you’re preparing a classic boule or fancy buns like cinnamon rolls. By understanding the right methods for shaping, proofing, and scoring, you can craft bakery-worthy loaves at home. Remember, every loaf is an opportunity to perfect your skills and experiment with new shapes and techniques. Happy baking!